Thursday, January 28, 2010
Recipe: Cookies & Cream Fudge
Cookies & Cream Fudge


3 packages (170 g each) white baking chocolate
300 mL can sweetened condensed milk
2 cups coarsely crushed chocolate creme filled sandwich cookies
pinch of salt
1. Melt chocolate with condensed milk and salt. Remove from heat. Stir in crushed cookies.
2. Spread onto parchment paper-lined 8"x 8" squared pan. Chill 2 hours or until firm. Cut into squares. Store in airtight container at room temperature.
Tips/Tricks/Notes
So far, this is the easiest fudge I have tried and it's one of my favourites. It is also a very fast firming fudge, when the recipe says 2 hours, it was ready in 2 hours. I found all the other fudges I have made took much longer before they were ready to be cut and eaten. My one recommendation is if you have a bigger pan then the 8"x 8" I would use it, something around a 9"x 9". I found with the 8"x 8" pan, the fudge turned out very thick and since it is very sweet I had to awkwardly try and cut thin slices.
The picture seen above is an actual picture I took of my completed fudge, it is not taken from the internet or played with in anyway.
Sunday, January 24, 2010
Recipe: Homemade Calzones
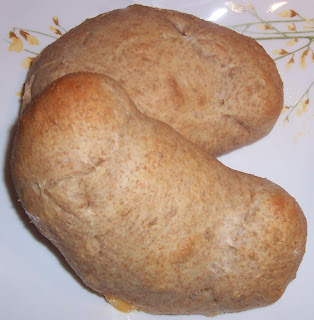
Homemade Calzones
Makes: 4 Calzones
1 Whole Wheat Pizza Dough (750 g/26 oz)
Marble Cheese Shredded
Preferred Pizza Tops for Stuffing (See below for ideas)
1. Preheat oven to 375 degrees.
2. Divide pizza dough into 4 smaller dough balls. Take 1 of the smaller dough balls and fallen making sure to keep the dough evenly thick. Place chosen toppings on ONE SIDE only. Make sure that you do not use too much toppings as you won't be able to close the calzone. Once all toppings are placed on one side, fold the empty side over top of the topping side then press the two edges together making sure that there are no holes.
3. Continue this with the other 3 dough balls. Place all on a baking sheet. Bake for 20-25 minutes or until dough is completely baked.
Tips/Tricks/Notes
You must make sure that there are no holes when you fold the dough over the toppings. If there is even a small hole the insides will slowly leak out as they are baking in the oven. Another tip, if you find the dough sticking to your hands as you try and flatten it out, try putting a tiny bit of flour on your fingers.
Some good ideas for toppings; I prefer mine filled with just cheese and pepperoni. My husband likes his with tomato sauce, cheese, pepperoni, olives, mushrooms and bacon bits. Of course the choices are basically endless. I also enjoy dipping mine in either ranch sauce or jalapeno cheddar sauce. Also, I enjoy using marble cheese, but that is also changeable.
The picture seen above is an actual picture I took of my completed calzones, it is not taken from the internet or played with in anyway.
Friday, January 22, 2010
Recipes Coming Soon
Recipes Coming Soon
Below are recipes I plan on trying within the next week to week and a half.
Desserts
Cookies n' Dream Fudge
Root Beer Fudge (pending I can located root beer extract)
Maple Fudge
Dinner
Homemade Calzones
Crock Pot
Chili - I haven't chosen a specific type to try yet.
Below are recipes I plan on trying within the next week to week and a half.
Desserts
Cookies n' Dream Fudge
Root Beer Fudge (pending I can located root beer extract)
Maple Fudge
Dinner
Homemade Calzones
Crock Pot
Chili - I haven't chosen a specific type to try yet.
Wednesday, January 20, 2010
Baking Ingredient Substitution List
Below is a list of a TON of substitutions if you happen to be missing a certain ingredient or maybe have a bunch of something you want to use in a recipe. This list has come in handy a few times already for me!
ammonium bicarbonate - 3/4 teaspoon
1 tsp baking soda
baking powder (single-acting) - 1 teaspoon
1/4 teaspoon baking soda plus 1/2 teaspoon cream of tartar plus 1/4 teaspoon cornstarch
baking powder (double-acting) - 1 teaspoon
1/4 teaspoon baking soda plus 1/2 teaspoon cream of tartar plus 1/4 teaspoon cornstarch. Use 1 tsp for every 1 cup of flour.
baking soda - 1/2 teaspoon
2 teaspoons double-acting baking powder (replace the acidic liquid in recipe with non-acidic liquid)
baking soda - 1/2 teaspoon
1/2 teaspoon potassium bicarbonate
buttermilk - 1 cup (240 ml)
1 tablespoon lemon juice or vinegar plus enough milk to make 1 cup (240 ml) (let mixture stand 5-10 minutes)
cake flour - 1 cup (130 grams)
3/4 cup (105 grams) all purpose flour plus 2 tablespoons (30 grams) cornstarch
cake flour - 1/3 cup
1/3 cup all-purpose flour less 1/2 teaspoon
chocolate (bittersweet or semi-sweet) - 1 ounce (30 grams)
1/2 ounce (15 grams) unsweetened chocolate plus 1 tablespoon (15 grams) granulated sugar
chocolate (unsweetened) - 1 ounce (30 grams)
3 tablespoons (20 grams) natural cocoa powder (not Dutch-processed) plus 1 tablespoon (14 grams) unsalted butter, shortening, or vegetable oil
cocoa powder, Dutch-Processed - 3 tablespoons (20 grams)
1 ounce (30 grams) unsweetened chocolate plus 1/8 teaspoon baking soda. Also reduce fat in recipe by 1 tablespoon.
cocoa powder, natural unsweetened - 1 ounce (30 grams) unsweetened chocolate. Also reduce fat in recipe by 1 tablespoon.
coffee, strong - 1/4 cup (60 ml)
2 tablespoons (10 grams) instant coffee in 3 tablespoons hot water
corn syrup, dark - 1 cup (240 ml)
3/4 cup (180 ml) light corn syrup plus 1/4 cup (60 ml) light molasses
corn syrup, light - 1 cup (240 ml)
1 cup (200 grams) granulated white sugar (increase the liquid in the recipe by 1/4 cup or 60 ml)
cornstarch (for thickening) - 1 tablespoon (15 grams)
2 tablespoons (25 grams) all purpose flour
cream of tartar - 1/2 teaspoon
1/2 teaspoon white vinegar or lemon juice
cream - half-and-half - 1 cup (240 ml)
7/8 cup (210 ml) whole milk plus 2 tablespoons (25 grams) melted unsalted butter
cream, heavy (not for whipping) - 1 cup (240 ml)
2/3 cup (160 ml) whole milk plus 1/3 cup (75 grams) melted unsalted butter
flour, self-rising - 1 cup (140 grams)
1 cup (140 grams) all-purpose flour plus 1-1/2 teaspoons baking powder plus 1/4 teaspoon salt
flour, whole wheat - 1 cup (150 grams)
7/8 cup (120 grams) all-purpose flour plus 2 tablespoon (6 grams) wheat germ
honey - 1 cup (240 ml)
3/4 cup (180 ml) light or dark corn syrup plus 1/2 cup (100 grams) granulated sugar
lard - 1/2 cup (113 grams)
1/2 cup (113 grams) solid vegetable shortening
lard - 1/2 cup (113 grams)
1/2 cup (113 grams) plus 1 tablespoon (14 grams) unsalted butter
marhsmallow cream - 2.5 ounces
8 large marshmallows or 1 cup miniature marshmallows
milk (sweetened condensed) - 14 ounce can (396 grams)
blend 1 cup instant nonfat dry milk plus 2/3 cup (135 grams) granulated sugar plus 3 tablespoons (35 grams) melted unsalted butter plus 1/2 cup (120 ml) boiling water
milk (evaporated whole) - 1 cup (240 ml)
1 cup (240 ml) half & half
milk (whole) - 1 cup (240 ml)
1 cup (240 ml) skim milk plus 2 tablespoons (25 grams) melted butter or margarine
molasses - 1 cup (240 ml)
1 cup (240 ml) dark corn syrup
sour cream - 1 cup (225 grams or 8 ounces)
1 cup plain yogurt
sour cream - 1 cup (225 grams or 8 ounces)
1 tablespoon lemon juice or vinegar plus whole milk to fill 1 cup (240 ml)
tapioca, instant or quick-cooking - 1 tablespoon (12 grams)
1-1/2 tablespoons (20 grams) flour
vinegar - 1/4 cup (60 ml)
1/3 cup (80 ml) freshly squeezed lemon juice
yogurt, plain - 1 cup (225 g)
1 cup (225) sour cream
Friday, January 15, 2010
Recipe: Peanut Butter Fudge
Peanut Butter Fudge

This is a SUPER easy and VERY yummy fudge! The only issue with this recipe was that at the time I first found it I didn't have a scale to measure out the 1 pound of sugar. I wanted to get one for many recipes and other things around the kitchen, so I invested in a high quality one, then I was able to complete this recipe. That would be the only down side to this recipe.
The picture seen above is an actual picture I took of my completed fudge, it is not taken from the internet or played with in anyway.

1 cup creamy peanut butter
1 cup butter
1 pound of powdered sugar
1 tsp vanilla
1. Line a 9" square pan with wax paper.
2. Melt the butter in a sauce pan on low heat, add the peanut butter and stir well making sure to fully blend. Remove from heat and cool.
3. In a large bowl, mix the powdered sugar and vanilla.
4. When the peanut butter/butter mixture is cooled, add it to the powered sugar and mix thoroughly until smooth.
5. Pour the mixture into the pan. Cover with waxed paper. Refrigerate for 4-6 hours or overnight.
Tip/Tricks/Notes
This is a SUPER easy and VERY yummy fudge! The only issue with this recipe was that at the time I first found it I didn't have a scale to measure out the 1 pound of sugar. I wanted to get one for many recipes and other things around the kitchen, so I invested in a high quality one, then I was able to complete this recipe. That would be the only down side to this recipe.
The picture seen above is an actual picture I took of my completed fudge, it is not taken from the internet or played with in anyway.
Monday, January 11, 2010
Recipe: Crock Pot - Mac and Cheese
Crock Pot Recipe - Macaroni and Cheese

2 cups of macaroni
1 tbsp vegetable oil
1 can (13oz) evaporated milk
1 1/2 cups milk
1 tsp salt
4 cups sharp cheddar cheese - shredded
1/2 cup butter - melted
1. Cook macaroni in boiling salted water - follow package directions. Drain well. Grease bottom and sides of crock pot.
2. Toss macaroni in crock pot with oil. Add remaining ingredients. Stir gently to combine. Cover.
3. Cook on low for 3 to 4 hours. Stir occasionally.
Tips/Tricks/Notes
This recipe is a much better Mac and Cheese then Kraft Dinner! It turned out great, and is just cheesy enough! I don't have any tips for this recipe other then it makes enough pasta to feed an army!
The picture seen above is an actual picture I took of my completed pasta, it is not taken from the internet or played with in anyway.
Friday, January 8, 2010
Recipe: Crock Pot - Fiesta Chicken
Crock Pot Recipe - Fiesta Chicken

2 tbsp oil
3 lbs boneless, skinless chicken breast cut into 1 inch pieces
1 medium onion - chopped
1 large green pepper - chopped
3 cloves garlic - minced
1 small jalapeno pepper - finely chopped
1 14 oz can Mexican style diced tomatoes
1/4 tsp cumin
1 tsp oregano
1. Heat oil in skillet. Cook chicken pieces until browned. Remove and drain. Place onion, green pepper, garlic and jalapeno pepper in skillet and saute until slightly cooked.
2. Add all ingredients to crock pot and stir to combine.
3. Cover; cook on low 7 to 9 hours or on high 3 to 4 hours. Serve on flour tortillas.
Tips/Trick/Notes
When I went shopping this morning I could not find "Mexican style diced tomatoes" so I substituted a Mexican salsa and it tasted great! We also added some cheese after adding the chicken mix to the tortillas. The only other note for this recipe is there is a fair bit of prep work - cutting up the chicken and all the veggies and precooking them. I think next time I will do all the prep the night before so I can just put on the pot and forget about it until dinner!
The picture seen above is an actual picture I took of my completed chicken, it is not taken from the internet or played with in anyway.
Differences Between Baking Powder & Baking Soda
Differences Between Baking Powder & Baking Soda
Well baking over the holidays I almost put baking powder into a recipe instead of baking soda, but happily I caught my mistake before it was too late. After finishing, I thought... what is the difference between baking powder and baking soda? It really bothered me so I looked it up online and I just wanted to share what I found. This is from www.about.com:
Both baking soda and baking powder are leavening agents, which means they are added to baked goods before cooking to produce carbon dioxide and cause them to 'rise'. Baking powder contains baking soda, but the two substances are used under different conditions.
Baking Soda
Baking soda is pure sodium bicarbonate. When baking soda is combined with moisture and an acidic ingredient (e.g., yogurt, chocolate, buttermilk, honey), the resulting chemical reaction produces bubbles of carbon dioxide that expand under oven temperatures, causing baked goods to rise. The reaction begins immediately upon mixing the ingredients, so you need to bake recipes which call for baking soda immediately, or else they will fall flat!
Baking Powder
Baking powder contains sodium bicarbonate, but it includes the acidifying agent already (cream of tartar), and also a drying agent (usually starch). Baking powder is available as single-acting baking powder and as double-acting baking powder. Single-acting powders are activated by moisture, so you must bake recipes which include this product immediately after mixing. Double-acting powders react in two phases and can stand for a while before baking. With double-acting powder, some gas is released at room temperature when the powder is added to dough, but the majority of the gas is released after the temperature of the dough increases in the oven.
How Are Recipes Determined?
Some recipes call for baking soda, while others call for baking powder. Which ingredient is used depends on the other ingredients in the recipe. The ultimate goal is to produce a tasty product with a pleasing texture. Baking soda is basic and will yield a bitter taste unless countered by the acidity of another ingredient, such as buttermilk. You'll find baking soda in cookie recipes. Baking powder contains both an acid and a base and has an overall neutral effect in terms of taste. Recipes that call for baking powder often call for other neutral-tasting ingredients, such as milk. Baking powder is a common ingredient in cakes and biscuits.
Substituting in Recipes
You can substitute baking powder in place of baking soda (you'll need more baking powder and it may affect the taste), but you can't use baking soda when a recipe calls for baking powder. Baking soda by itself lacks the acidity to make a cake rise. However, you can make your own baking powder if you have baking soda and cream of tartar. Simply mix two parts cream of tartar with one part baking soda.
Thursday, January 7, 2010
Recipe: Maple Sugar Cookies
Maple Sugar Cookies

1 cup butter flavoured shortening
1 1/4 cups sugar
2 eggs
1/4 cup maple syrup
3 tsp vanilla extract
3 cups all purpose flour
3/4 tsp baking powder
1/2 tsp baking soda
1/2 tsp salt
1. In a large bowl, cream shortening and sugar until light and fluffy. Add eggs, one at a time, beating well after each addition. Beat in syrup and vanilla. Combine the remaining ingredients; gradually add to the creamed mixture and mix well. Cover and refrigerate for 2 hours or until easy to handle.
2. On a lightly floured surface, roll out to 1/8 inch thickness. Cut with a floured 1/2 inch cookie cutter. Place 1/2 inch apart on ungreased baking sheet.
3. Bake at 350 degrees for 9-12 minutes or until golden brown. Remove to wire rack to cool.
Tips/Tricks/Notes
These cookies have just the right flavouring of maple! Ideally you would want to use a maple leaf shaped cookie cutter for these cookies. As you can see by the above picture, I did not have one when I did this recipe so I just rolled the dough into balls and placed the balls on a cookie sheet.
The picture seen above is an actual picture I took of my completed cookies, it is not taken from the internet or played with in anyway.
Wednesday, January 6, 2010
Recipe: Cathedral Cookies
Cathedral Cookies

This is another very simple recipe. When I made these I did not add the pecans or walnuts as all my other treats were either peanut butter or had nuts so I needed something nut free. I also rolled only half in the coconut for the people who do not like coconut. I will also note, because I was baking many things on the same day, the dough got left in the fridge for about 45 minutes instead of the 30 minutes and it was very hard to work with, so I recommend that you make sure you get to it in the 30 minutes.
The picture seen above is an actual picture I took of my completed cookies, it is not taken from the internet or played with in anyway.

1 cup semi-sweet chocolate chips
2 tbsp butter
1 egg, beaten
3 cups pastel mini marshmallows
1/2 cup pecans or walnuts
1 cup flaked coconut
1. In a heavy saucepan, melt chocolate chips and butter over low heat, stir occasionally. Stir a small amount into egg, and then return all to pan. Cook and stir over low heat for 2 minutes. Pour into bowl; let cool for 15 minutes. Gently stir in marshmallows and nuts. Chill for 30 minutes.
2. On a sheet of waxed paper, shape dough into a 1 1/2 inch diameter log. Place coconut on another sheet of waxed paper. Gently roll log over coconut to coat sides. Wrap up tightly, twisting ends to seal.
3. Freeze for 4 hours or overnight. Remove waxed paper. Cut into 1/4 inch slices. Store in airtight container in the refrigerator.
Tip/Tricks/Notes
This is another very simple recipe. When I made these I did not add the pecans or walnuts as all my other treats were either peanut butter or had nuts so I needed something nut free. I also rolled only half in the coconut for the people who do not like coconut. I will also note, because I was baking many things on the same day, the dough got left in the fridge for about 45 minutes instead of the 30 minutes and it was very hard to work with, so I recommend that you make sure you get to it in the 30 minutes.
The picture seen above is an actual picture I took of my completed cookies, it is not taken from the internet or played with in anyway.
Monday, January 4, 2010
Recipe: Cherry Polka Dot Fudge
Cherry Polka Dot Fudge

3 cups semi-sweet chocolate chips
1 can (300 mL) sweetened condensed milk
2 tsp vanilla extract
1/2 cup chopped glace cherries
1/2 cup mini marshmallows
1. Melt chocolate chips with condensed milk. Remove from heat. Stir in vanilla, cherries and marshmallows.
2. Spread evenly in parchment paper lined 8" square pan. Chill 4 hours or until firm.
3. Remove from pan and peel off paper. Cut into squares.
Tips/Trick/Notes
Out of all the fudges I tried this season, this one has to have been the sweetest and also the heaviest. At the time that I did this recipe I could not find "glace cherries" anywhere, so I was recommended to use maraschino cherries. I had no idea what a glace cherry or an maraschino cherry were, so I looked it up online. For anyone else who would like to know, the answer is below!
Another note for this recipe, I recommend allowing the chocolate/milk mixture to cool slightly before adding the marshmallows. When added right away as the recipe calls for; a lot of the marshmallows melted and then were just mixed into the fudge.
Glace and Maraschino Cherries:
A maraschino cherry is a preserved, sweetened cherry, typically made from light-colored sweet cherries such as the Royal Ann, Rainier, or Gold varieties. The cherries are first preserved in a brine solution (usually sulfur dioxide) or alcohol, then soaked in a suspension of food coloring, sugar syrup, artificial and natural flavors, and other components.
Further steps along this process make GLACE and crystallized cherries; after soaking, the cherries are drained and then soaked in glucose and air-dried, producing glace cherries; a further stage involves another soaking in glucose which coats them with sugar, creating crystallized cherries.
The picture seen above is an actual picture I took of my completed fudge, it is not taken from the internet or played with in anyway.
Saturday, January 2, 2010
Recipe: Brown Sugar Fudge
Brown Sugar Fudge

The picture seen above is an actual picture I took of my completed fudge, it is not taken from the internet or played with in anyway.

1 can (300 mL) sweetened condensed milk
2 cups well packed brown sugar
1/2 lb butter
1. Place ingredients in microwave safe mixing bowl and microwave on HIGH for 10 minutes, stirring every 2 minutes. Let cool slightly.
2. Beat with mixer for 5 minutes.
3. Spread mixture into parchment lined 8" square pan. Chill to set.
Tip/Tricks/Notes
This has to be one of the easiest fudges I have made and it was also the biggest hit of all the fudges I made this year. My only tip would be to stir the mixture sooner then every 2 minutes, I would say about every 1 and a half minutes is better, but it may also depend on the microwave.
Friday, January 1, 2010
Baking Tips
These are some tips I have found on the internet that have come in very handy so I thought I would share them.
Baking Tips
-Always follow recipes exactly and read them through at least once before starting. Make sure you understand all steps involved.
-Do not use imitation extracts, use the real extracts called "pure" - it makes a difference!
-Pre-measure all ingredients and have them ready before you start.
-To test the freshness of an egg without breaking it, place it in enough water to cover it well. If it sinks and lies on its side, it is fresh. If it sinks but stands on end, it is not very fresh. If it floats, don't use it.
-Enhance the flavour of nuts, such as almonds and pecans, by toasting them before using in recipes. To toast, place nuts on a baking sheet and bake at 300°F (180°C) for 5 to 10 minutes or until slightly browned.
-A range for baking time is often given in recipes to allow for variations in the temperatures in household ovens. Be sure to set the timer for the shorter recommended baking time and test for doneness before there is any chance of overcooking.
-To determine when drop cookies are done, touch the center gently with your finger. If almost no imprint is left and the cookies are a nice colour, remove them from the oven.
Cookie Sheets
-A shiny, aluminum cookie sheet at least two inches narrower and shorter than the oven is best for evenly browned cookies. The sheet may be open on one, two, or three sides. Do not grease the cookie sheet unless the recipe states to do so. If a dark colored cookie sheet is used, watch carefully for browning. Always place cookie dough on cool cookie sheets.
Recipe: White Chip Lemon Streusel Bars
White Chip Lemon Streusel Bars

1 can (14 oz) sweetened condensed milk (not evaporated milk)
1/2 cup lemon juice
1 tsp freshly grated lemon peel
2 cups (12 oz package) white chocolate chips, divided
2/3 cup butter or margarine, softened
1 cup packed light brown sugar
1 1/2 cups all-purpose flour
1 1/2 cups regular rolled or quick-cooking oats
3/4 cup pecan pieces
1 tsp baking powder
1/2 tsp salt
1 egg
1/2 tsp shortening
1. Heat oven to 350 degrees. Lightly grease 13x9x2 inch baking pan. Combine sweetened condensed milk, lemon juice and lemon peel in medium bowl; set aside. Measure out 1/4 cup and 1/3 cup white chips; set aside. Add remaining white chips to lemon mixture.
2. Beat butter and brown sugar with electric mixer on medium speed in large bowl until well blended. Stir together flour, oats, pecans, baking powder and salt; add to butter mixture, blending well. Set aside 1 & 2/3 cups oats mixture. Add egg to remaining oats mixture, blending until crumbly; press on to bottom of prepared pan. Gently spoon lemon mixture on top, spreading evenly. Add reserved 1/3 cup white chips to reserved oats mixture. Sprinkle over lemon layer, pressing down lightly.
3. Bake 20 to 25 minutes or until lightly browned. Cool in pan on wire rack. Place remaining 1/4 cup white chips and shortening in small microwave safe bowl. Microwave at medium 30 seconds or until chips are melted and mixture is smooth when stirred. Drizzle over baked bars. Allow drizzle to set; cut into bars.
Tips/Tricks/Notes
My only tip with this recipe is to make sure to very carefully read the recipe before you even start. I found these bars to be a little more complex then many other things I have baked as there are many layers... meaning many steps! Also, these bars are best served after chilled in the fridge for a while. I found if they are kept and eaten at room temperature they are very messy, but if kept in the fridge you are saved from the mess!
The picture seen above is an actual picture I took of my completed bars, it is not taken from the internet or played with in anyway.
Subscribe to:
Posts (Atom)
Links
